Heath Robinson approach nets high end results.
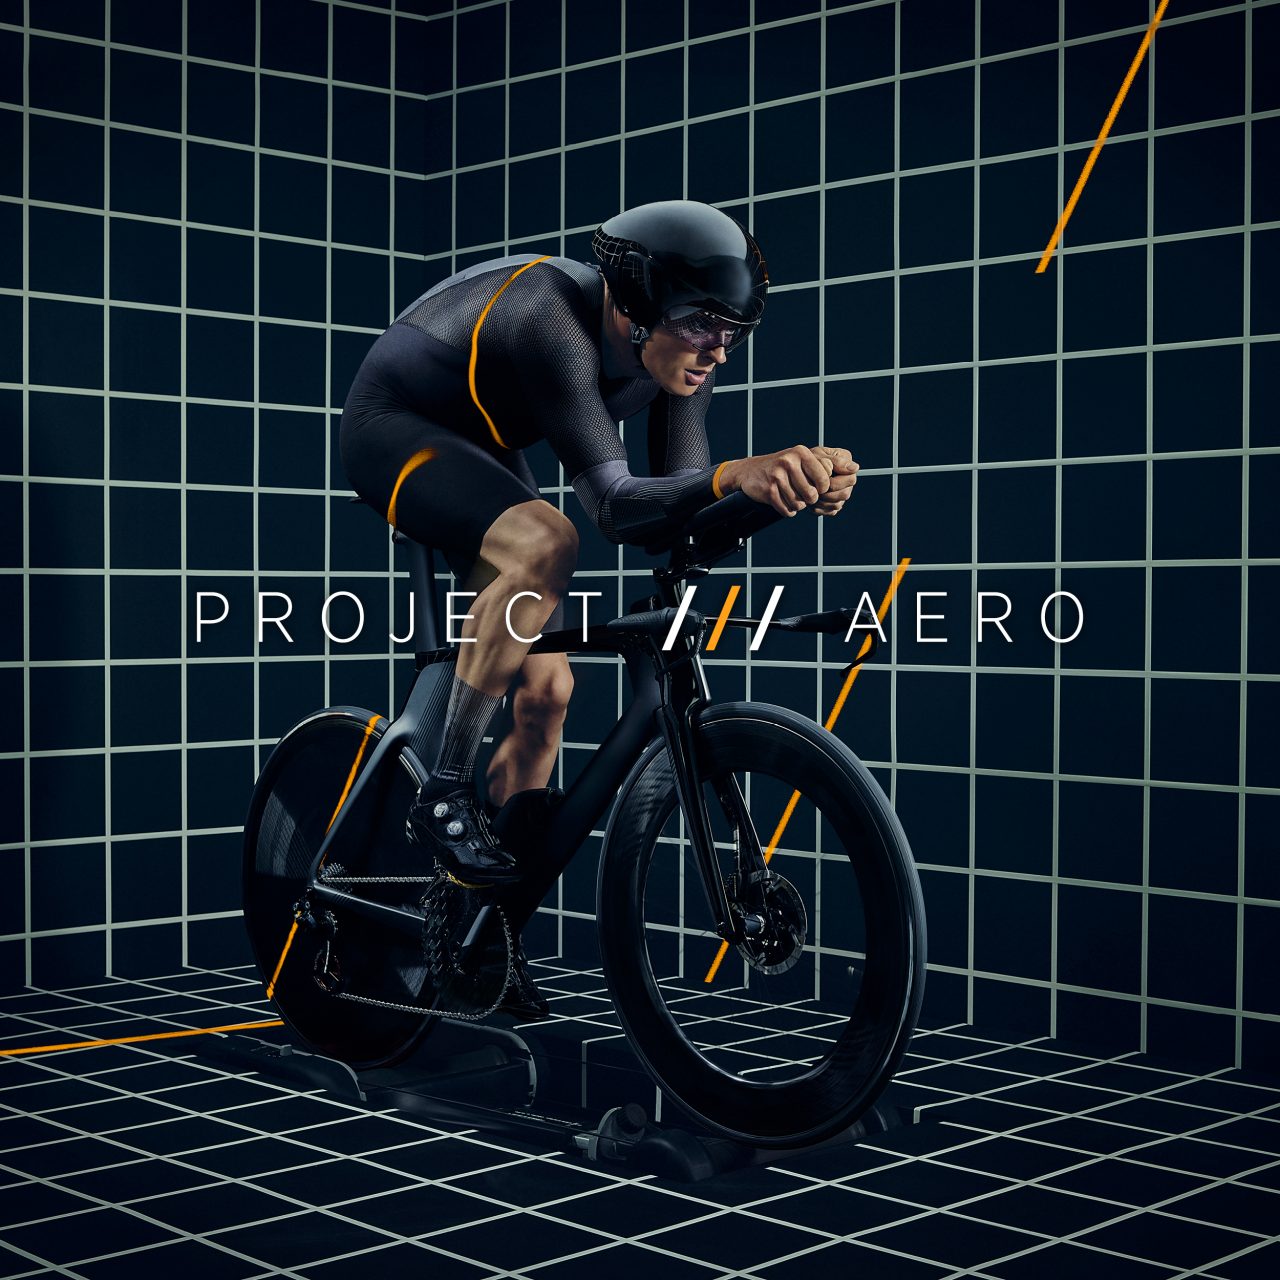
Behind the scenes of a recent photo shoot for Le Col x McLaren, seeing what goes in to making a finished shot for the launch of their Aero clothing range.
With so much technology at our fingertips it’s easy to get too carried away when it comes to photoshoots. CGI and post-production techniques are a big part of the process these days and often relied upon to get the desired results, but it’s not always the case and sometimes a more basic approach nets great results.
As a photographer, I’ve always tried to capture as much in camera in a single shot rather than rely on multiple shots which are later composited in post-production. There’s nothing wrong with either method but I generally prefer images created this way as they tend to feel more authentic. That’s not to say I don’t use re-touchers and post-production because I do, but their job tends to be putting the finishing touches and treatments to the image rather than building it from multiple elements.
A recent job for Le Col x McLaren is one of those jobs that looks quite sophisticated but actually relied on some good old fashioned set building and creative lighting.
Working with https://www.limitededitiondesign.co.uk/ the concept for this shoot was loosely inspired by the studies Eadward Muybridge’s made of animals in motion, which he recorded back in 1877-78. Muybridge’s most famous images of horses galloping were taken to demonstrate the correct gait of a horse in motion which had been depicted incorrectly in paintings up until this point. He later went on to record other animals and even people in a variety of actions set against a grid background.
In an attempt to get away from the classic references of wind tunnels for aero concepts, we gave a nod to Muybridge by incorporating a black and white grid backdrop to imply a sense of science, testing and measurement. It was decided to build a set in a studio using traditional set building techniques rather than looking to CGI to create it.
When building a set like this it’s important to consider the materials you are going to use, the scale of the set and how you are actually going to light it. It might also need to be adaptable on the day so you can more things around. The best approach for building room set is a lightweight wooden framework with a stretched canvas over the top. This allows a single facet for each wall which is important if you want the light hitting that wall to be consistent. Fabric also absorbs light well and is easy to paint and dispose of at the end of a shoot. Room sets can be difficult to light effectively so it’s better to use only two walls, if possible, which allows lighting from the side and above.
All in all, it took a full day to build the set and paint the canvas plus another morning to add the white stripes (made from tape). The floor was slightly trickier as we wanted to sink the rollers into it, so they were less apparent. It was also important to consider the placement of the rider from the background walls as we didn’t want to get too many shadows falling on the set. For this reason, we also used very soft lighting by constructing a scrim above the rider to light through. The final touch to the set was a laser to create a red beam of light.
So, with the set built and lit it was just a case of getting the shot. The practicalities of riding a full-blown TT bike on a set of rollers in a confined space is not easy. Balancing on the rollers in this position on a very twitchy bike could result in the whole canvas set being ruined with one mistake. Luckily, we had Adam MacRae, a very experienced rider and Le Col ambassador who performed the job perfectly.
With all shots there’s always a few compromises which you have to weigh up. There’s the balancing of the flash lights whilst keeping the shutter on the camera open long enough to allow the laser beam to show up. Too long an exposure results in unwanted ambient client and motion blur, too short and you cannot see the beam of the laser. There’s a balance to getting what you need and what you can fix later in post-production. We actually shot at 15th second which is very slow for a sports motion shot knowing we would have to fix the motion drag in post. We also took a series of background plates of the set with no rider, in case we needed to comp some elements.
The retouching wasn’t too complicated, but it was certainly invaluable in helping to elevate the final images by giving them a treatment that couldn’t be caught in camera. It’s very much a balance between capturing the image in camera and using photoshop to polish and correct a few flaws. That’s not to underestimate the retouching as it’s really the icing on the cake that brings the whole shot together.
—
Thanks to all involved.
Concept & design: https://www.limitededitiondesign.co.uk/
Hair & make Up: https://www.celinebopp.com/
Retouching: https://philborgretouching.com/
Studio: https://www.ps-spaces.com/
If you have an upcoming project you’d like to discuss, please contact me on photography@michaelblann.com
View more images from the shoot here.


